Introduction
About this guide
This guide has been written to inform users how to enable the Advanced Nearby functionality on forms, allowing submitters to view other similar submitted Service Requests and proceed accordingly, giving the submitters an option to be notified on similar reports.
For example, this functionality can be used for Fly Tipping reports, preventing councillors from receiving multiple Service Requests for the same flytip.
Configuration
Configuring Advanced Nearby on Form Level
Firstly, go into Forms Builder from Administration, and select the form you want to enable this functionality on.
Select the form on the form tree and set the ‘Nearby’ option to Enabled.

Note – Please ensure that the location picker component on the form is set to Primary.
Once this has been enabled, the ‘Advanced near by settings’ region will appear on the Form configuration. Scroll down to access these settings:

Distance from current location – This will show the submitter the reports from a radius around the pinned location on the primary location picker. This will only show the submitter other reports from the same form. For example, in this case, reports in a radius of 2 miles from the pinned location will appear.
Submission Date – This must be configured to filter the nearby reports by their reported date. For example, if our submission date is 30 days, and a nearby report is 2 months old, this will not appear for the submitter.
Status Type – Here, you can select the types of statuses of nearby reports that you wish to show. In our example above, any status with the ‘completed, closed or cancelled’ type will not appear.
Questions to be compared – This option can allow the user to compare the configured answers with the most recent nearby report:
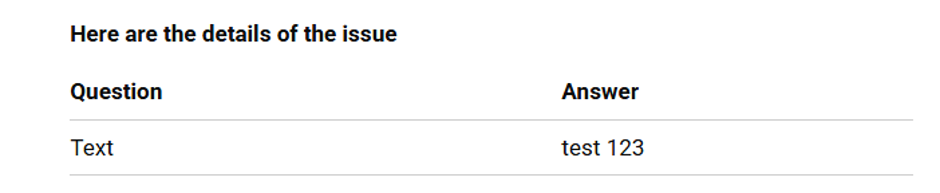
Customer Information – If enabled, this will show the Service Request number, the Date and the Status of the most appropriate nearby report, as shown below:

If disabled, the ‘Questions to be compared’ region, along with the customer information and the pin of the nearby report will not appear.
Share the Following Information – This tick box option gives the submitter the following options depending upon which are ticked:
- Allow Customer Choice – This will provide the submitter with options to either decide that the nearby report is the same issue, in which case they can either cancel their SR, or be updated on the nearby report’s progress; or that the nearby report is not the same issue, in which case they can continue with the report.
- Date Reported – Ticking this box will allow the submission date of the nearby report to show under the ‘Nearby Reports’ region of the Advanced Nearby Component
- Map – Enabling this will show the map, including the pin of the nearby report, in the Map region of the Advanced Nearby Component.
- Status – When this is enabled, the status of the nearby report will be shown to submitters in the ‘Nearby Reports’ region of the Advanced Nearby Component.
Actions to Take – This provides the options for customers on how they wish to proceed. If ‘Allow Customer Choice’ is enabled, submitters can chose between the below options. If the ‘Allow Customer Choice’ option is disabled, one option can be selected by the form builder:
- This is not the same issue, and I would like to continue to submit this report – This will allow the submitter to continue with the form, creating a new SR:

- This is the same issue, and I would like to be updated on progress – This will inform the submitter that they will receive status updates on the nearby form when the submitter completes their request. The submitter’s form is not submitted.
This is only available to logged-in submitters, such as Customers and Users.

- This is the same issue and I will not continue to submit this request – This will prompt the submitter to cancel their request on the next page, as the nearby report matches their issue. This prevents duplicate reports on the same issue.

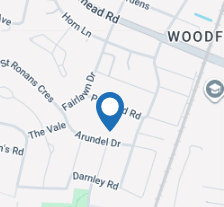
If there is a nearby report that matches the pre-configured conditions, a blue pin will denote the location of the nearby SR:
If there are no nearby reports, the following text will display:
“There are no similar reports within the location selected”.
Configuring Location Picker Component
For nearby reports to be shown on the primary location picker, you must enable the ‘Show near by reports’ option. This will reveal the following options:

Displayed Item – The selected information will show when the nearby report’s pin is clicked, allowing submitters to view information about the nearby report on the location picker.
Radius – This decides how far from the location picker’s pin the nearby reports appear. It is recommended that this value is the same as the radius configured on the Nearby settings on form level,
Submission Date – This option filters nearby reports by their submitted date. Any forms older than the configured date will not appear on the location picker.
Status and Priority – This, if applied, filters nearby reports by a specific status or priority.
Configuring Advanced Nearby Component
Lastly, you will need to create an item on the page after the location picker. Select the item type ‘component’ and then select ‘Advanced near by (Web only)’ from the dropdown list:

Was this article helpful?
That’s Great!
Thank you for your feedback
Sorry! We couldn't be helpful
Thank you for your feedback
Feedback sent
We appreciate your effort and will try to fix the article