Introduction
About this guide
This guide explains how to configure the Trade Waste process.
The process includes configuration of many steps including customer portal forms, products and EWC codes, quote types, statuses and transitions, contract types and templates, quote and contract print layouts, branding and document outputs, rules and automated notifications, waste collection schedules, and organisation portal access.
Key Terms
The below are key terms which will be used throughout the Trade Waste configuration process:
- Organisation – The business or commercial customer applying for trade waste services.
- Organisation contact – A customer user linked to an organisation who can submit requests and use the organisation portal.
- SIC code – Standard Industrial Classification code identifying the organisation’s type of business.
- EWC code – European Waste Classification code identifying the type of waste collected.
- Service Request (SR) – The case created when the customer submits the trade waste application.
- Quote – The quote with products, discounts and markups used to offer the collection service to the organisation.
- Contract – The formal agreement created after the organisation accepts the quote.
- Waste Transfer Notice – The document generated from the contract and stored against the organisation.
- Collection schedule – The planned collection days created from the contract and agreed services.
Pre-Requisites
Before you can configure Trade Waste, you must first have configured all of the following:
- A Trade Waste customer application form and a Signature customer form (more details about these are available in the ‘Pre-Requisite Forms’ section below).
- Contract templates including statuses and transitions
- Products for waste items including EWC codes
- Industries for SIC codes
- Quote templates/types including statuses and transitions
- Waste Transfer Notice document templates
- Rule processes
- Email templates
- Portal access for organisation contacts
Pre Requisite Forms
As previously mentioned, the two forms are required:
Trade Waste Customer Application Form
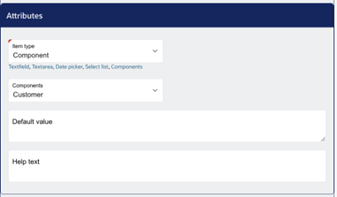
This should include a Customer Component. This enables the customer to select the organisation they are applying on behalf of. The customer must be linked as a contact for the organisation.
Add the component, ensure you select the fields which are required as part of the customer confirmation i.e. First Name, Last Name, Email.
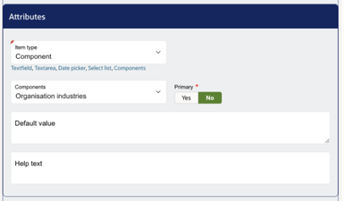
This should also include the Organisation Component, which displays and allows amendment of SIC codes for the organisation.
Add the component, ensure that the setting ‘Primary’ is set to “No”.
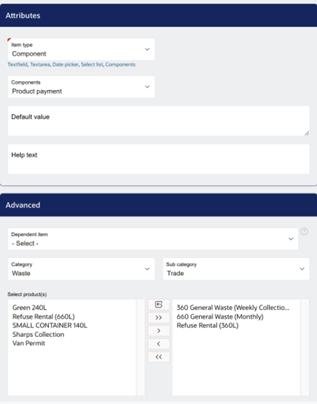
Finally, a Product Component is also required. This allows the customer to select trade waste items required. This is optional and products may alternatively be added manually to a quote.
Add the component, configure the Product Category and required Products for selection
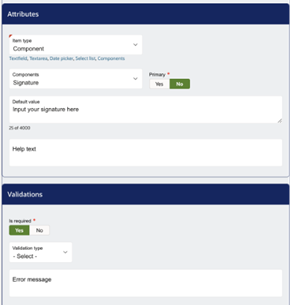
Signature for Waste Transfer Note Request Form
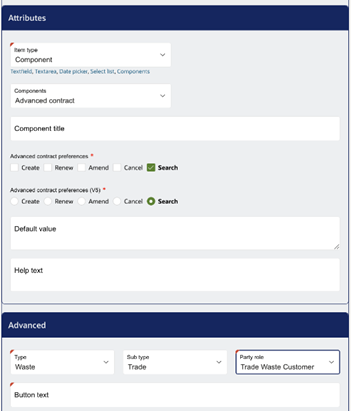
This should include an Advanced Contract Component set to Search. This allows the customer to select the contract to associate the signature with.
Add the Advanced Contract Component, selecting ‘Search’ options. Select the Type, Sub Type and Person Type as set in the Contract Template configuration.
This should also include a Signature Component, which allows the customer to sign and associate the signature with the selected contract.
Add the signature component, and ensure that the setting ‘Primary’ is set to “No”.
Configuring Types, Statuses, Transitions and Rules
Quote types with the appropriate templates, statuses and transitions govern the quote creation process.
Configuring Quotes Statuses
You can configure these statuses by going to Administration > Quote > Status.
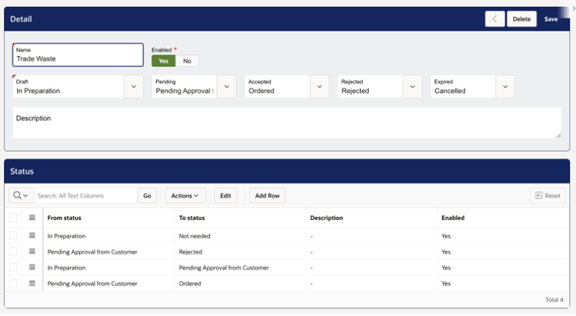
Typical statuses include Draft, Pending, Agreed, Rejected, Expired and Closed.
Where statuses represent Accepted, Rejected, or Expired, the status must be set as Final = Yes.
Configuring Quotes Transitions
Configure Quote Transitions under Administration > Quote > Transition to define the allowed status changes. Map the statuses created to the appropriate stage i.e. Draft, Pending, Accepted, Rejected, Expired.
Configuring Quote Types
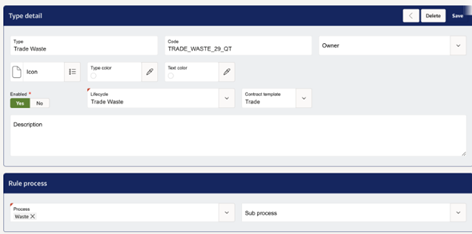
Now, configure the Quote Type under Administration > Quote > Type and map it to the appropriate contract template and transition lifecycle.
Configuring Quote Rules
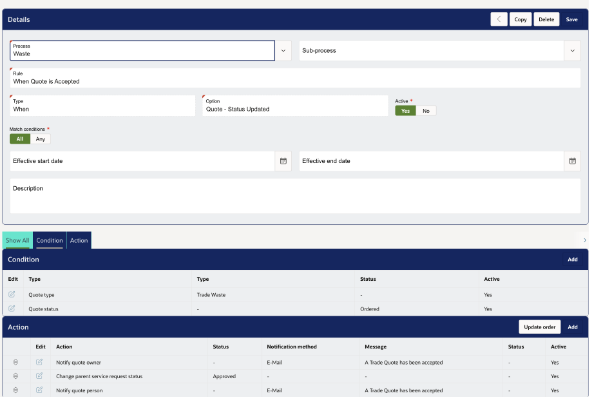
Next, we recommend that you configure Quote Rules to automate actions such as sending emails, updating statuses, notifying officers and customers, and updating linked service requests.
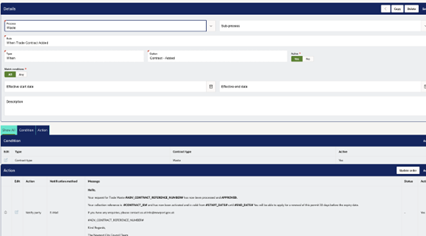
Configuring Contract Templates
Contract templates associated with the quote determine start and end dates and available products for selection from the quote to the Contract.
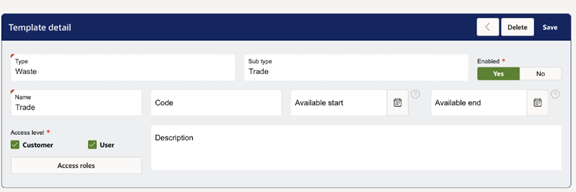
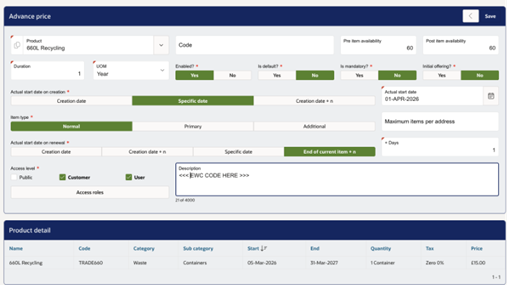
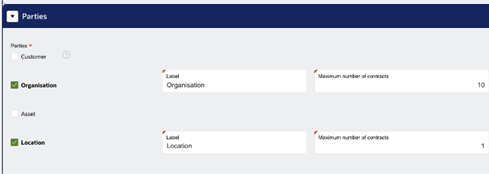
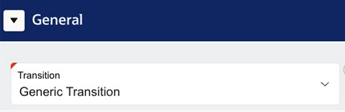
An appropriate Advanced Contract Template is required to determine the following. It is set up in the following way:
- Type and Sub Type should be set as these will be used further in rules:
- Prices – these should be Products and will need to match those Products which are selected on the quote. The EWC code will need to be added to the
- Product description - The creation date and duration will determine the start and end dates of the Contract:
- Party types i.e. Organization and Location
- An appropriate Transition with the relevant statuses to manage the workflow will need to be configured on the Template.
- Rules are configured so that when a contract is created, the Waste Transfer Notice is generated, stored against the organisation, and optionally emailed to organisation contacts. The Print layout options are detailed below:
Configuring Contract Print Layout
A Waste Transfer Notice can be generated from the contract using a Contract Print Layout.
The Print Layout should be configured as Type ‘Contract’, SubType ‘Print Contract’ and with the tags mentioned below:
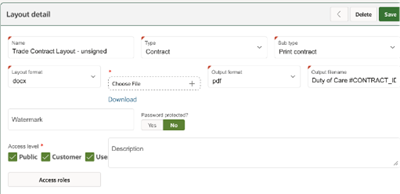
Other tags are available on the standard print layout, but the tags below are required to give Products, Organisation and Signature tags for the Waste Transfer Note:
Products (from Contract Prices)
{#item}{period}{product}{soldQuantity}{description}{/item}
Organisation (from Contract Party)
{organisationName}
{organisationAddr1}{organisationAddr2}{organisationAddr3}{organisationCity}{organisationPostCode}
{organisationSICCodes}
Customer
{customer} – contact person on Organisation Party
Signature
{%signature}
{serviceRequestSubmitter} – this will take the customer name of any associated Service Request (FORM 2)
EWC codes should be added to the Contract Price Description – this will appear in the tag {description} –
Signature, this will take the signature of any associated Service Request (FORM 2)
{serviceRequestSubmitter} – this will take the customer name of any associated Service Request (FORM 2)
Configure Waste Collection Scheduling
Collections can be created from the contract.
The schedule must reflect the agreed collection pattern and may include weekly collections, monthly collections, selected weekdays, or adhoc schedules.
Administrator Checklist
Please refer to this checklist to ensure that all of the required steps have been completed:
- Customer portal forms created
- Organisation component added
- Product component added
- SIC details configured
- Signature field added
- Mandatory fields configured
- Form creates the correct Service Request type
- Organisation records enabled
- Organisation contacts configured
- Industry classifications configured
- Portal document access enabled
- Trade waste products created
- Prices and VAT configured
- Products available on the form and copied to quote/contract
- Quote and contract print layouts configured and tested
- Trade Waste Service Request form configured
- Statuses configured
- Create Quote action enabled
- SR-to-quote link tested
- Trade Waste quote type, statuses, transitions, and rules configured
- Quote email templates configured
- Trade Waste contract type configured
- Contract dates configured
- Contract rules and email templates configured
- Waste Transfer Notice generation tested
- Organisation contact can sign in and submit on behalf of the organisation
- Waste schedule area configured
- Regular and adhoc schedules tested
- Rules configured for Quote Status Updated, Contract Added, and Contract Status Updated
Was this article helpful?
That’s Great!
Thank you for your feedback
Sorry! We couldn't be helpful
Thank you for your feedback
Feedback sent
We appreciate your effort and will try to fix the article