Contents
- Introduction
- Viewing an account
- Account side menu
- Community – People | Importing People
- Community – People | Notify People
- Community – People | Duplicates
Introduction
About this guide
This guide has been written to provide an overview of the Community > People area. This part of the system allows administrators to view, create and edit customer accounts in various ways.
Community - People
Searching for an account
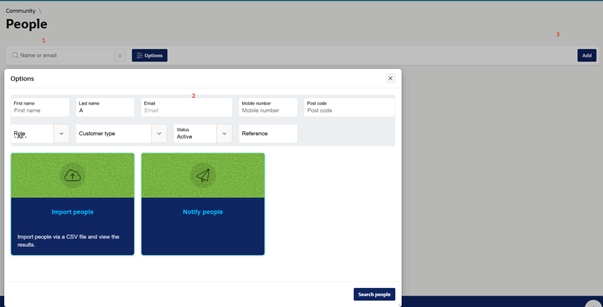
If you wish to search for an account, you can do so using the following methods:
- Search bar using the name or email address of the account
- Using the ‘Options’ button, then searching from the list of options provided
- Clicking ‘add’ then searching for an account.
Creating a new account
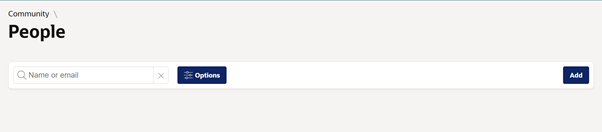
To create a new account, you must first click on the ‘add’ button at the top-right of the screen:
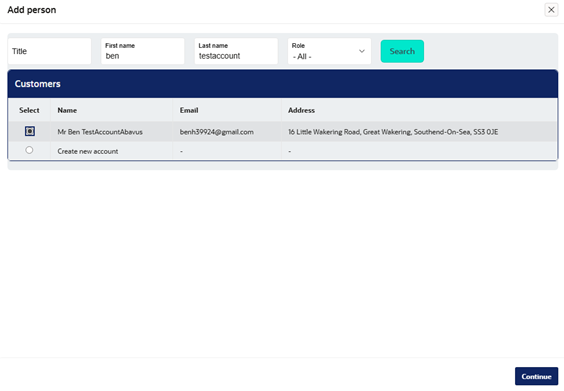
This will bring up a search box, where you must first search for a person before the option to create a new account appears. This functionality exists to aid in preventing the creation of duplicate accounts.
If an account is found, you can select the account and click ‘continue’ to proceed to the account, or you can select ‘create new account’ to open the account creation menu.
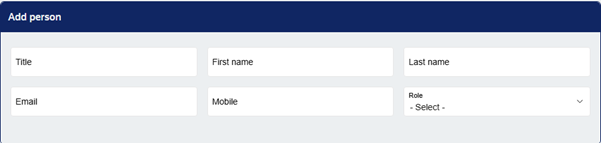
Selecting ‘create new account’ will open the following menu with the core account details. First name, last name, email address, and role are mandatory here. If setting the role to ‘user’ and initial access role will need to be selected.
Viewing an account
Within an account
When either searching for and selecting an account, or creating a new account, you will land on the profile page. This contains all the information relating to the selected person within the My Council Services platform.
Region - Details
The details region displays the fundamental information of the account. This includes the names, genders, date of birth and age, among other options. The information noted with an orange flag are mandatory for the account:

Region - Addresses
Here is where the address information of the account is shown. Multiple addresses may be added to the account if needed. One address must be set to ‘primary’ – this address cannot be deleted. These can be edited / deleted via the edit icon and viewed as a map view with the map icon.

Region - Contact Point
Here is where contact information is displayed, such as an email address, phone number and URLs. An email address is mandatory, as this is the method by which the account logs into the platform.

Region - Attachments
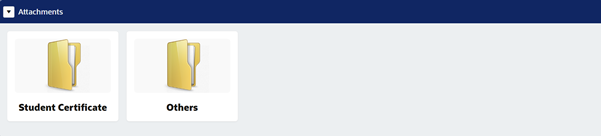
Files added to the account can be viewed here. If a document type is configured when uploading the file, a folder with the document type will appear, as shown below. If a document type is not configured, the file will show under the ‘others’ folder.
Region - Notes
Any notes made against the account will show here. This can add information about the customer, such as being dangerous, a frequent caller, or any information deemed important by the CSA.

Region - Relationships
If the account has any relationships to any other account, they will show here. This can be used to link one account to another. If a relationship is configured, it will show on both linked accounts.

Region - Organisations
If the account is a part of any organisations, it will show here, as well as their position within the organisation.

Account side menu
Menu overview
On the right-hand side of the profile’s page, there are configuration options for the account, allowing the user to add details, manage the account and track data related to the account. Below is a walkthrough of what each option is and how to use it:
Account number and profile picture
The number displayed at the top of the region is the account number. This is a unique reference number associated with the account. You can search for the account via this number on the Community module.
If the account has a profile picture, it will show here. You can add or remove the profile picture as required.
Account status
The status of the account will be visible within the profile.
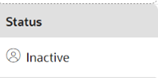
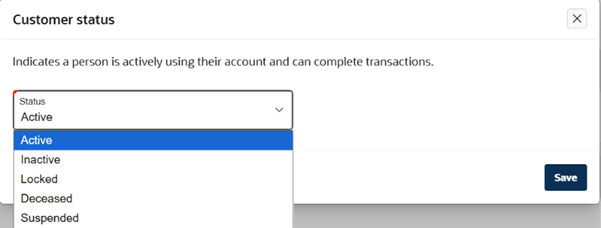
Clicking on the status will allow you to edit the status of the customer. For example, if the account’s owner is deceased, you can assign the account’s status accordingly. If the status of an account is change to ‘locked’ or ‘suspended’ the user will no longer be able to login to the platform.
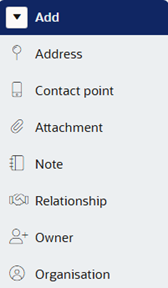
Add options
Using these options, you can add various detail to the account. These include:
- Addresses – primary address and other addresses. The primary address will pull into form location pickers where ‘default to home address’ is enabled.
- Contact Points - such as email and phone number.
- Attachments – documents can be logged against an account.
- Notes
- Relationships – accounts can be linked together.
- Owner
- Organisations – an account can be part of an organisation.
Manage options
The account’s data and settings can be managed with these options.
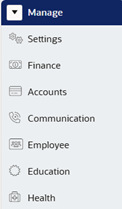
Below is a breakdown of what each option does:
Settings
This option allows you to do the following to the account:
- Assign a customer type, alert, time zone and language:

- Enable location tracking, vehicle inspections and providing access to a weekly ‘people’ analytics report (only recommended for user accounts)

- Tracks the saved searches of the account:

- Allows the user to view and edit the access roles of the account and SSO options:

- Allows the user to view and change the notification groups the account is signed up for:

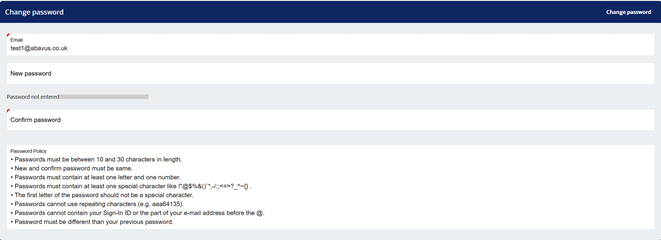
- Allows the user to change the account’s password, displaying the council’s password policy:
- Allows the user to Erase the account’s details and association with Service Requests without removing the service request:

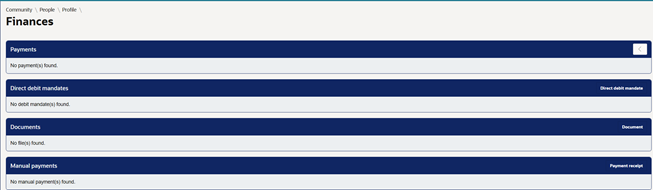
Finance
This page shows any payment, direct debits, manual payments or documentation related to payments to be viewed:
Account
This setting provides an option for users to deregister the account they are viewing. This is useful when the account contacts the council and requests that their data be removed from the system.
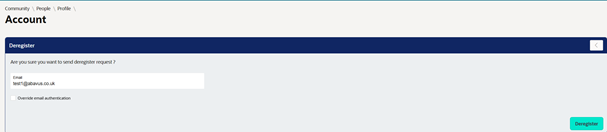
Once this email is sent off, the account owner can confirm deregistration via email. This can then be confirmed by a user via the People – Deregister setting under Analytics.
Communication
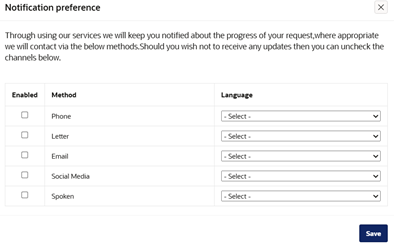
Allows the preferred communication method and language to be logged against a person's account.
Employee
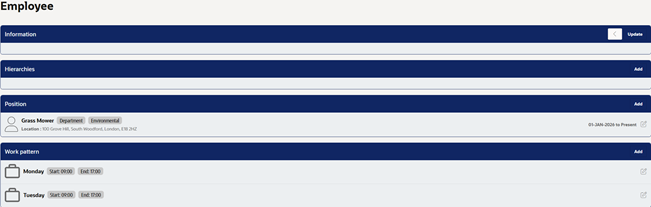
On this page, the position and work pattern can be assigned to the account to add more detail and provide more information on the role the user plays and when they are available. This is only recommended for user accounts.
Education
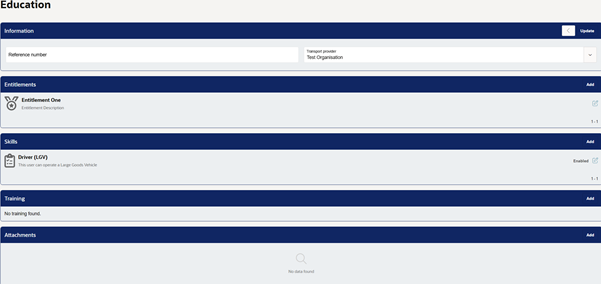
This page provides details regarding the account’s skills, education, entitlements and training. This is recommended for user accounts only.
Health
The health page provides information relating to the health of the account owner. This can provide valuable information when assessing how to deal with certain people.
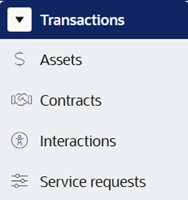
Transactions
This section allows users to quickly view any connections between the following:
- Assets – This could include allotments or asset bookings.
- Contracts – Garden Waste Subscriptions and other contracts can be viewed here.
- Interactions – Interactions created by the CSA team via Contact Centre can be viewed by clicking on ‘Interactions’
- Service Requests – Any Service Requests submitted by the account can be viewed here.
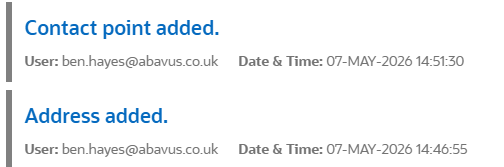
View Menu
With these settings, you can view details relating to the account, such as if access roles were changed, statuses were updated, attachments were added etc. This will show you what user made the changes, and when they did so.
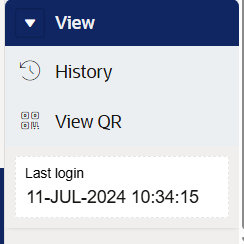
You can also generate a QR code which directly connects the QR code user to the account.
Moreover, you can confirm when the account was last logged into, which assists with determining how often the account is accessed by the account owner.
Community – People | Importing People
About Importing Accounts
In the Community – People > Options menu, you can large amounts of data in bulk, using CSV files. For instance, you can gather data on your customers, place this data in a CSV file under specific headings, and then upload the file. The system will then process the data overnight.
How to Import Accounts
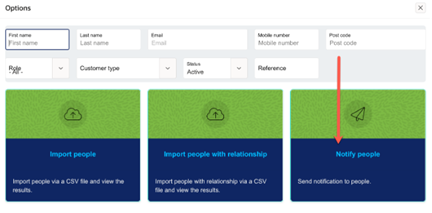
Go into Community > People and click on 'Options'.
A pop-up will appear on the screen, with the option to "Import people". Click on it.
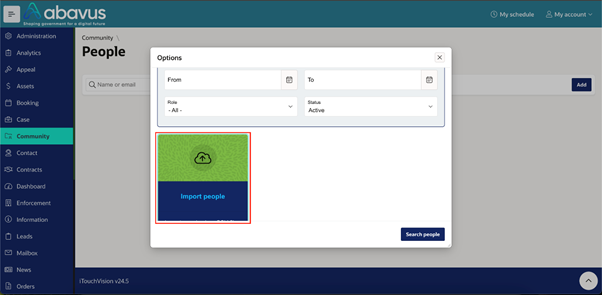
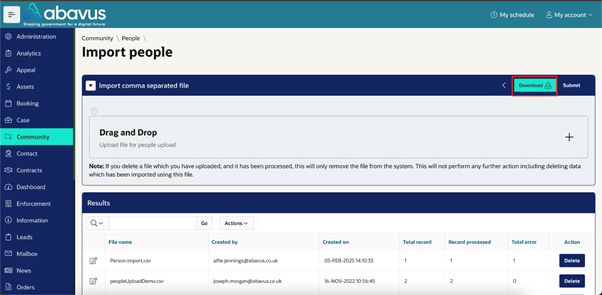
You will be taken to the following screen. This is where you can upload CSV files and view the results. You will first need to get a copy of the CSV file template needed.
Click on ‘Download’ to save the template file.
The template file should look like the following:
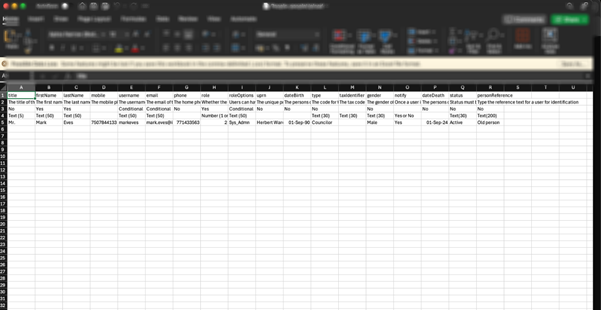
There are multiple fields to fill out, which are explained in further detail below:
title
The title of the person. This is a free text field.
- Required = No
- Format = Text (limited to 5 characters)
- Example = Mr.
firstName
The first name of the person.
- Required = Yes
- Format = Text (limited to 50 characters)
- Example = Mark
lastName
The last name of the person.
- Required = Yes
- Format = Text (limited to 50 characters)
- Example = Eves
mobile
The mobile phone number of the person.
- Required = No
- Format = Number
- Example = 07507844133
username
The username of the person. This is used when the person does not have an email address. If an email address is unavailable, a username is required.
- Required = If no email address present
- Format = Text (limited to 50 characters)
- Example = markeves
The email address of the person. This is used to allow the person to log in to the platform. If an email address is unavailable, a username is required.
- Required = Yes, otherwise configure a username
- Format = Text (limited to 50 characters)
- Example = mark.eves@itouchvision.com
phone
The home phone number of the person.
- Required = No
- Format = Number
- Example = 07714335630
role
Whether this person is an admin user or a customer. Use 2 for a customer, and 1 for an admin user.
- Required = Yes
- Format = Number (1 or 2)
- Example = 2
roleOptions
Users can have further role options that allow you to specify what actions the user can carry out. This field is only used when the role is 1. You will need to use the specific code of the role.
- Required = Yes, if an admin user
- Format = Text (limited to 50 characters)
- Example = Sys_Admin
uprn
The unique property reference number of the person's address, 12 digits in length.
- Required = No
- Format = Number
- Example = 100123456789
dateBirth
The date of birth of the person.
- Required = No
- Format = Number
- Example = 01/09/1990
type
The code for the customer type.
- Required = No
- Format = Text (limited to 30 characters)
- Example = Councilor
taxIdentifier
The tax code for the person.
- Required = No
- Format = Text (limited to 30 characters)
- Example = 1250L
gender
The gender of the person. Options are male, female, and prefer not to say.
- Required = No
- Format = Text (limited to 30 characters)
- Example = Male
notify
Once a person is added, you can opt for the platform to email them. This will inform them of their account creation and will ask them to set their password.
- Required = No
- Format = Text (Yes or No)
- Example = Yes
Insert all the details required, and save the changes you have made to the template file. Under "Import comma separated file", upload the CSV file you have configured.
Click on 'Submit' to process the data upload, which will be implemented into your system overnight. You can return to this page to check the results of the file upload.
Community – People | Notify People
About the Notify People Functionality
The Notify Person functionality allows Users to deliver targeted communications by segmenting customers based on defined criteria. This ensures messages are relevant and can be tailored to recipients effectively.
Setting Up Notify Person
Go to Community > People > Actions > Notify People
Options
To determine who the notification is sent to, you can select the following filter options, which are explained below:
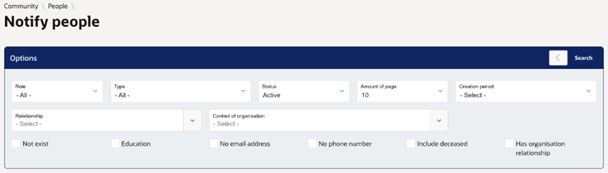
Role - Defines whether the notification is sent to customers or administrators, ensuring messages are appropriate for the recipient’s role.
Type - Customers can be assigned configurable types (e.g. student categories, councilors, business users) which can be used for segmentation.
Status - Each customer has a status such as Active, Suspended, or Deceased, allowing further control over communication targeting.
Relationship - Defines how customers are linked (e.g. Parent of, Carer of). Enables sending notifications to related individuals such as parents or carers.
Creation Period - Filter customers based on when they were created, e.g. newly imported within the last 2 weeks.
Amount per Batch - Controls how many notifications are sent at once to manage load and stagger communications. ‘Batch’ will send overnight using a scheduled process. This is recommended for larger number of emails.
No Email or Phone Number - Allows generating letters for customers without contact details or sending SMS only where mobile numbers exist.
Include Deceased - Optional setting to include or exclude deceased customers.
Not Exists - Allows targeting customers who have not completed an action within a defined period (e.g. follow-up reminders).
Education - Allows targeting customers who have a specific Transport Provider, Education Establishment or Entitlement. These defined within the person record, and Education section.
People
Once the filters are selected, click ‘Search’. The accounts matching the search criteria will be returned within the ‘Person’ region, as shown here:

From here, the appropriate person records can be selected. ‘Select All ‘is available for convenience.
Creating the Message
Here, a message can be typed manually, or an email template can be used. Notification messages can be saved as templates and reused for future communications, ensuring consistency and reducing setup time.
When creating the message, dynamic fields allow personalisation of notifications by inserting customer data into messages. These are automatically populated from the selected record during sending. The dynamic fields are explained below:
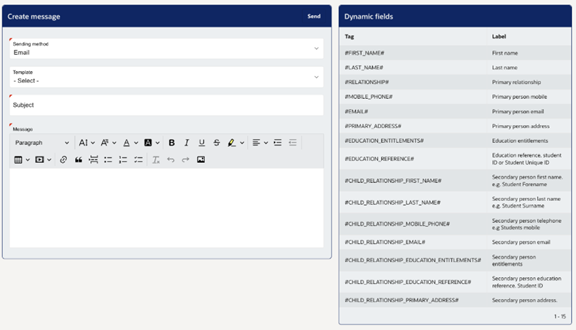
Primary Person Fields
- #FIRST_NAME# – First name
- #LAST_NAME# – Last name
- #RELATIONSHIP# – Relationship type
- #MOBILE_PHONE# – Mobile number
- #PRIMARY_ADDRESS# – Address
- #EDUCATION_ENTITLEMENTS# – Entitlements
- #EDUCATION_REFERENCE# – Education reference
Secondary Person Fields
- #CHILD_RELATIONSHIP_FIRST_NAME# – First name
- #CHILD_RELATIONSHIP_LAST_NAME# – Last name
- #CHILD_RELATIONSHIP_MOBILE_PHONE# – Mobile number
- #CHILD_RELATIONSHIP_PRIMARY_ADDRESS# – Address
- #CHILD_RELATIONSHIP_EDUCATION_ENTITLEMENTS# – Entitlements
- #CHILD_RELATIONSHIP_EDUCATION_REFERENCE# – Education reference
Below is an example of a notification’s configuration, with a side-by-side comparison of what the recipient would see:
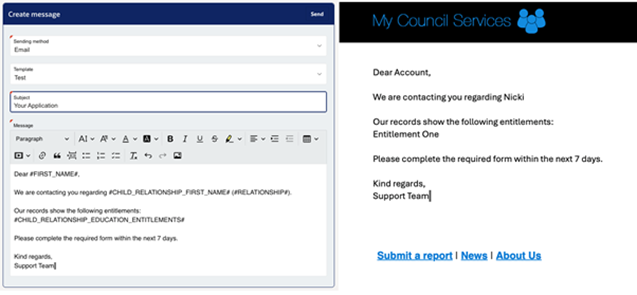
Community – People | Duplicates
Merging accounts on Community
Within Community, you will have the ability to merge duplicate customer accounts that have been registered with your MCS system. This will place all Transactions onto a selected “Master” account from amongst the accounts selected in the Merge.
To merge an account, go into Administration > Community > People
Then, enter a name or email address and search. The ‘Options’ button provides a more specific search function, where you can search for first names, last names, etc.
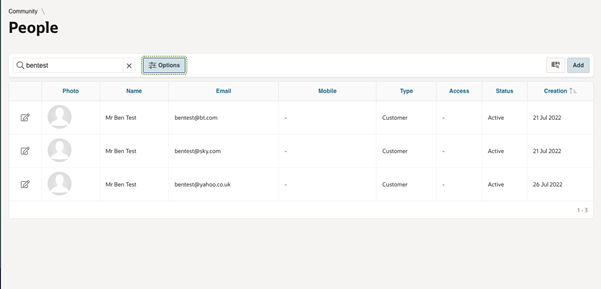
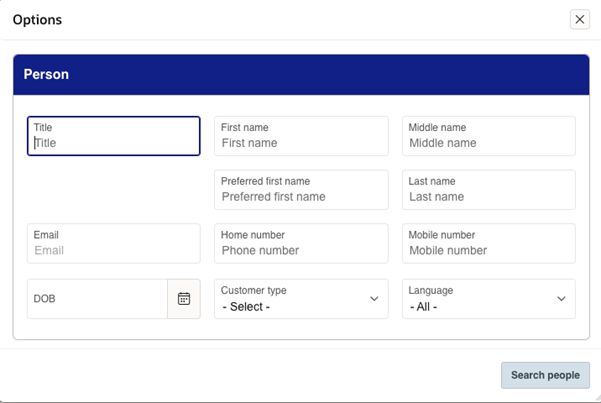
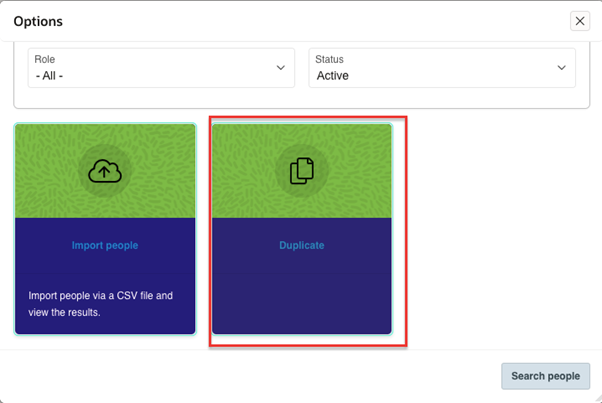
Once you've done this, click on Options > Duplicate. You will need to scroll down on the options menu to see this.
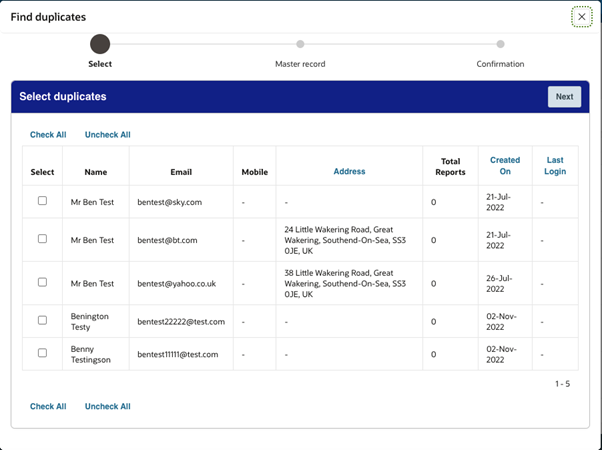
The following screen will appear, where you can select the accounts, you want to Merge. Click ‘Next’ to continue.
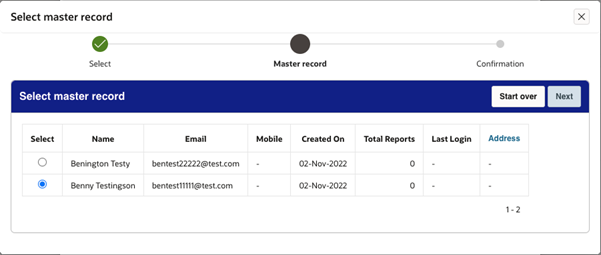
You now need to select the ‘Master Record’. All transactions from the selected duplicate accounts will be transferred over to this "Master Record". Click ‘Next’ to continue.
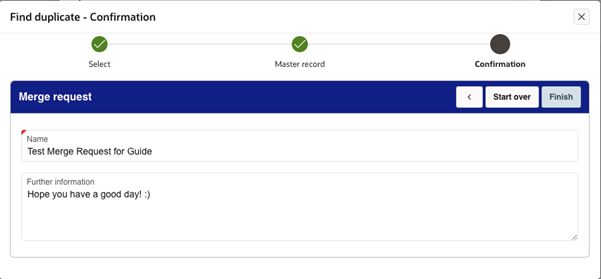
You will be brought to the confirmation page, where you'll need to enter a ‘Batch Name’. This will allow for further scrutiny and viewing of the Merge before it takes place. Click on ‘Finish’.
Validating the Merge Request
To validate this merge request, the batches that you create need to be processed. This is done via Administration > Data > Custodian.
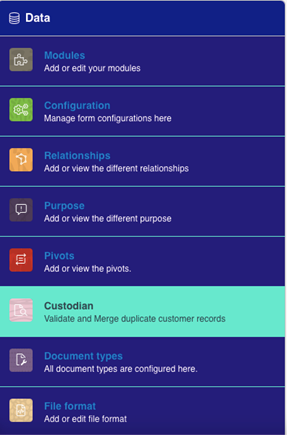
From here, you can view all Batches that have been submitted, and those currently pending for review:
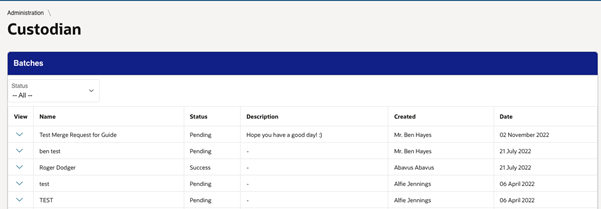
You can view Batch details before deciding by clicking on the ‘View’ Icon.
This will provide you with the audit history of the Batch. You can also view Batches by their current Status, if required.
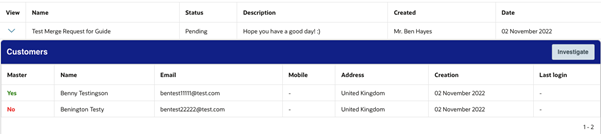
Click on ‘Investigate’ to proceed. You'll be given three options:
1. Save - This allows you to make further changes before Merging accounts.
2. Reject - This removes the Batch from the list and cancels the Merge.
3. Merge - This will Merge the accounts specified.
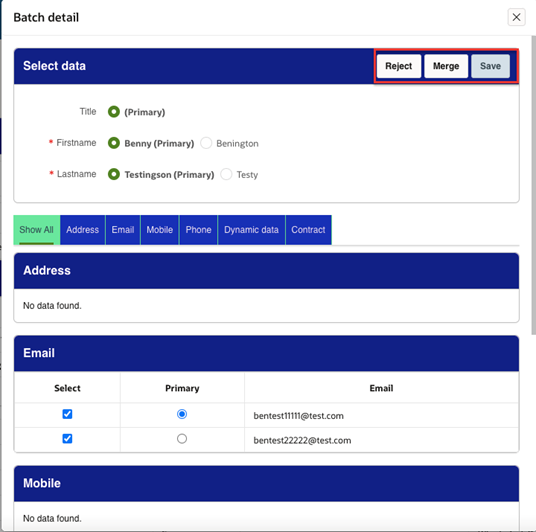
Select the relevant data to be applied to the master record, which is gathered from the selected customer records. Go through each tab to choose the data that needs to be transferred, then click on ‘Merge’ to finish.
Additional Information
Batches are processed on a scheduled basis, usually overnight.
Appropriate access roles need to be allocated against an admin user account for them to use the account merge feature.
Was this article helpful?
That’s Great!
Thank you for your feedback
Sorry! We couldn't be helpful
Thank you for your feedback
Feedback sent
We appreciate your effort and will try to fix the article