Introduction
About this guide
This guide has been written to document how to set up Statuses and Transitions for Bookings.
This is a pre-requisite for the bookings functionality, providing the ability for customers to create bookings for bookable items, such as Events, Assets, Waste, Rooms etc.
Configuring Statuses
Getting Started
To configure a status for a booking, go to Administration > Bookings and Appointments > Status
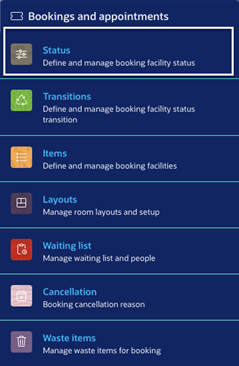
Then, click on ‘Add’ on the top right of the screen:

The following page will appear. To set up a booking transition, you will need to create 4 statuses, one with each of the following 4 status types for each stage of a booking transition:
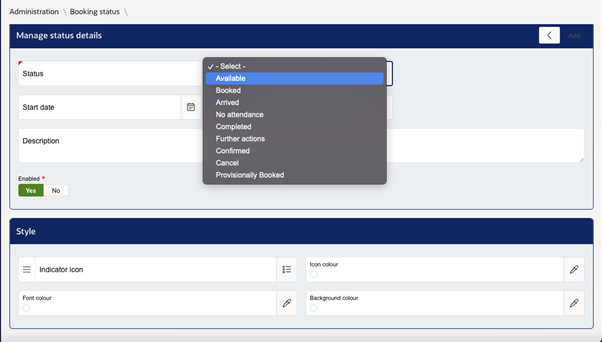
Available - This is the Status that shows a Booking slot is available. When setting up a Transition, this Status should be held under "Initial status".
Cancel - This is the Status that informs the system that a Booking has been cancelled. The system will free up the previously reserved Booking Slot. When setting up a Transition, this Status should be held under "Cancel status".
Confirmed - This is the Status that informs the system that a Booking is being made. The system will lock the user's chosen Booking Slot for up to 15 minutes before submission. When setting up a Transition, this Status should be held under "Reserved status".
Booked - This is the Status that shows a Booking Slot has officially been booked. The system will not allow the Slot to be booked by anyone else, unless the Booking is cancelled. When setting up a Transition, this Status should be held under "Confirmed status".
Optionally, you can also add a status with the ‘completed’ type for once the purpose of the booking has been fulfilled.
Once you have added these statuses, you can now create the booking transition.
Configuring the Booking Transition
Creating the Transition
Return to the Administration page, then find ‘Transitions’ in the Bookings and Appointments tab
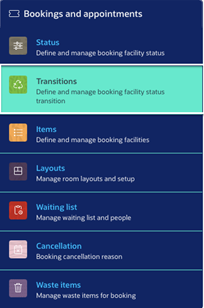
Then, click on ‘add’ on the top right of the page:

Now, name the booking transition, and select the 4 aforementioned statuses in their respective statuses:
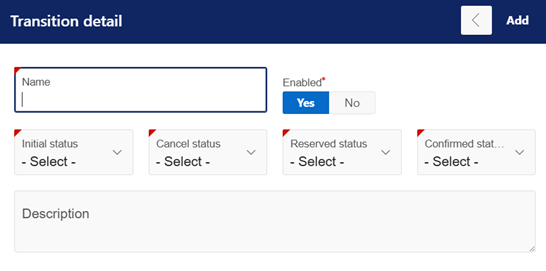
To recap, the following status should go in each of the above status options:
Initial Status – The booking status with the ‘Available’ status type
Cancel Status – The booking status with the ‘Cancel’ status type
Reserved Status – The booking status with the ‘Confirmed’ status
Confirmed Status – The booking status with the ‘Booked’ status.
Now, click ‘add’ to reveal the status pathways. These allow the Administrator to change the status from one to another. It is recommended that you configure at least the following:
Initial Status > Reserved Status
Initial Status > Confirmed Status
Cancel Status > Initial Status
Reserved Status > Confirmed Status
Reserved Status > Cancel Status
Confirmed Status > Cancel Status
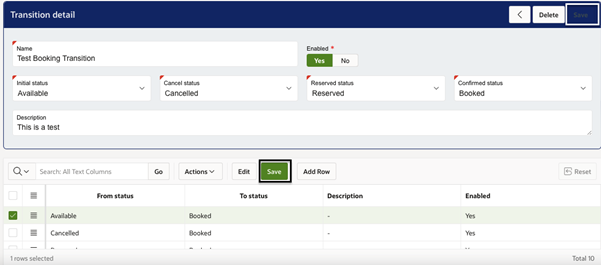
Once these have been created, click the ‘save’ button above the status pathways, then click ‘save’ on the transition.
Now, you can apply this transition to any bookable item.
Was this article helpful?
That’s Great!
Thank you for your feedback
Sorry! We couldn't be helpful
Thank you for your feedback
Feedback sent
We appreciate your effort and will try to fix the article