Document Summary
This document outlines the configuration process for Service Messaging within the Service module, enabling email responses to be tracked and attached as notes to Service Requests.
It covers setting up an Enterprise Application in Microsoft 365 for authentication, configuring account and note settings within the MCS Client, and establishing essential mail templates. The process ensures secure and efficient email integration using Microsoft Graph API, OAuth 2.0 authentication, and specifies important steps such as API permissions, mailbox setup, and the use of unique identifiers in email templates for accurate service request tracking.
The Service Messaging functionality enables the tracking of responses from emails within Service Requests within the Service module.
M365 Mail Client
Microsoft Graph API is used to facilitate the sending and receiving of emails with the desired domain/tenant and mailbox.
The system will send and receive emails using an M365 mailbox (not Shared Mailbox) using OAuth 2.0 - SMTP Authentication.
All prerequisites and set-up are detailed in this document. This document outlines the four step to configure this functionality.
Microsoft Graph API is used to facilitate the sending and receiving of emails within the specified Microsoft 365 tenant and domain, using a dedicated M365 user mailbox only.
The system must use a standard M365 user mailbox to send and receive emails. Shared mailboxes are not supported and cannot be used for this integration. Authentication is performed using OAuth 2.0 via SMTP authentication.
All prerequisites and configuration requirements are detailed in this document, which outlines the four steps required to set up this functionality.
M365 Enterprise Application
The following configuration will need to be undertaken by your Microsoft Entra administrator
- Enterprise Application.
An Enterprise Application is required within the M365 tenant to ensure the appropriate authentication to receive and send emails.
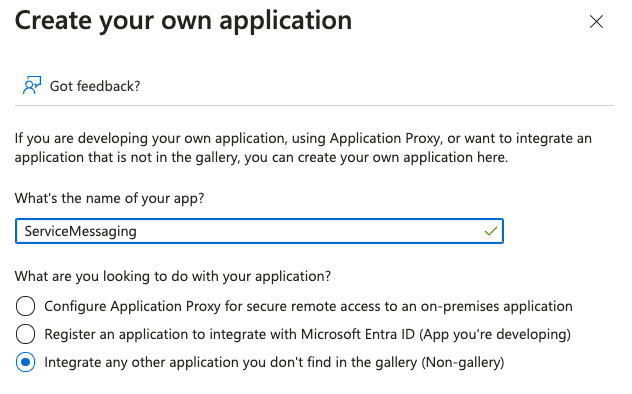
- Within Manage Microsoft Entra ID, go to Enterprise Applications, ‘Create your own application’. Specify option ‘Integrate any other application you don’t find in the gallery (Non gallery)
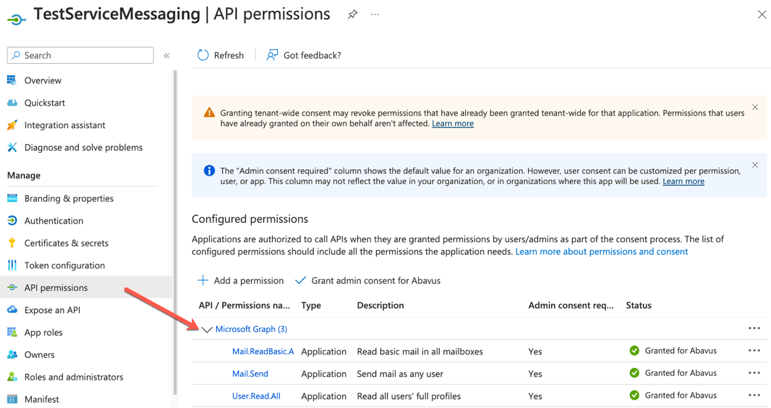
Manage > API Permissions – configure the following Microsoft Graph permissions:
Permission | Type | Purpose | Access Scope | For Service Messaging? | Notes |
Mail.Send | Application | Send mail as the signed-in user | Allows sending emails from the user's mailbox | No | Required for outbound messaging |
Mail.ReadBasic.All | Application | Read basic metadata of all users' mailboxes | Subject, sender, received date, etc. (excludes body, attachments, previewBody) | Yes | Used for lightweight email metadata access |
User.Read.All | Application | Read full profiles of all users in the directory | Includes job title, department, manager, contact info, etc. | Yes | Useful for user lookup and directory integration |
Mail.ReadWrite | Application | Read and write access to all mail in the signed-in user's mailbox | Full access to read, create, update, delete messages including body content | Yes | Required for full mailbox integration and service messaging |
Contact support if you require further assistance with setting up the permissions.
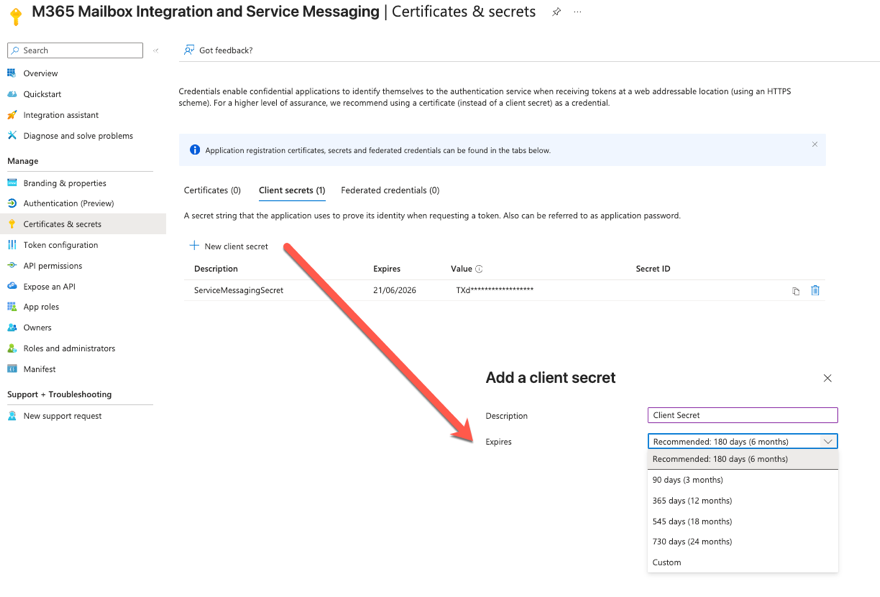
Please note at this point, from App Registrations,
Overview > Application (client) ID
Overview > Directory (tenant) ID
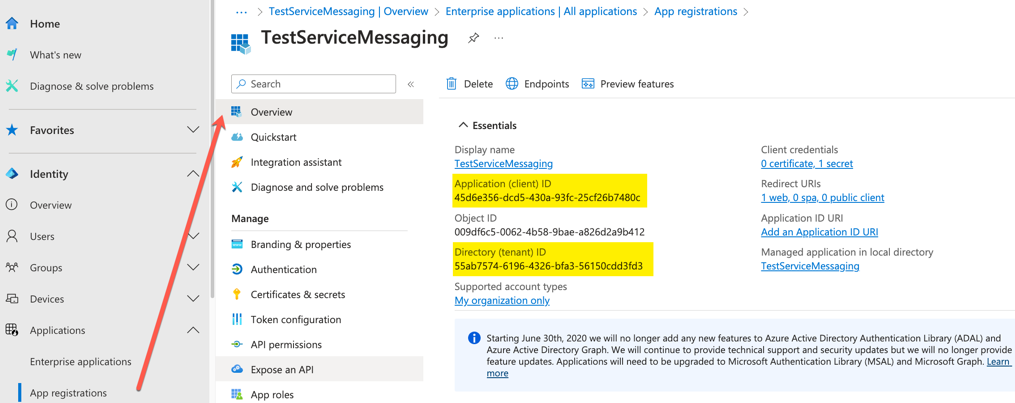
Manage > Certificates & Secrets > Client secrets > Value
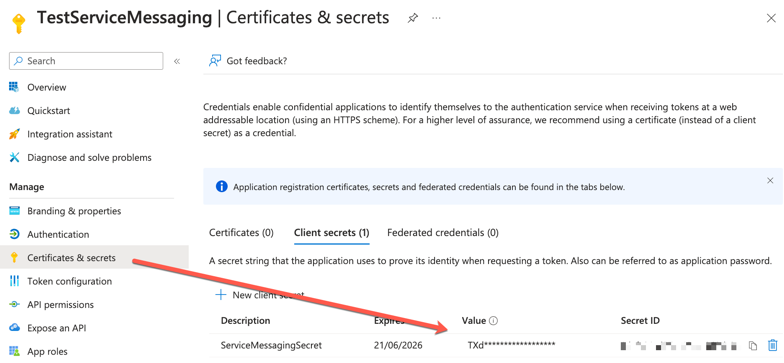
Make sure to record the client secret's end date since it must be renewed before it expires. If the expiry date passes, emails will no longer be sent from any delegated mailbox. Update the Account as described below.
Microsoft Graph Permissions Approach (Enterprise Application)
Within the Enterprise Application, two Microsoft Graph permission models are supported: Delegated permissions and Application permissions.
Delegated permissions can function by configuring a username and password within MCS, enabling authentication under a user context.
However, this approach is not recommended, as it requires storing user credentials and introduces additional security and maintenance considerations.
Recommended Approach
- Use Application permissions, which operate using app-only authentication and do not require a username and password.
- This removes dependency on user credentials and provides a more robust and supportable solution.
- Further restrict the application so it can only send email from a designated mailbox such as using a management scope/application access policy or any other Microsoft-recommended controls.
Account Configuration
Within your MCS Client, go to Administration > Mail > Accounts > Email
- The M365 account must be set as ‘Default’ to allow the sending and receiving of emails for all default emails.
Go to Administration > Mail > Accounts > Email
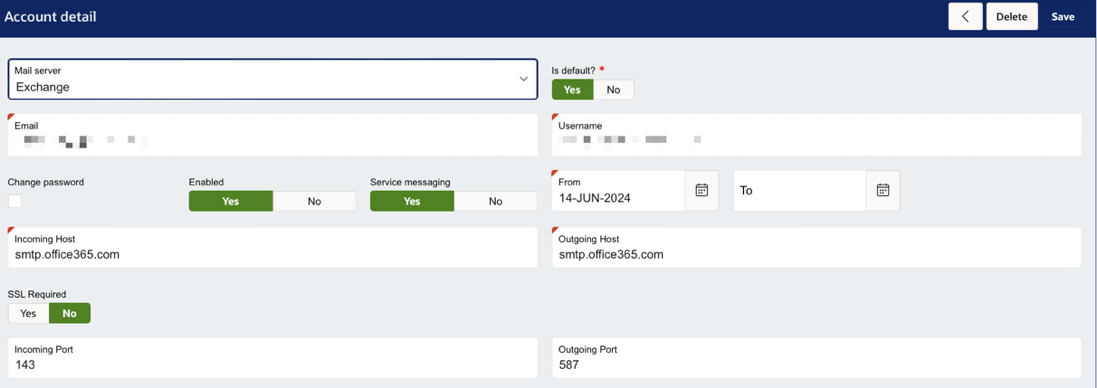
- Enter the email address.
- Set 'Mail Server' to 'Exchange'.
- Enter the incoming and outgoing port values will default to 143/587. Incoming and Outgoing Host values will default to smtp.office.365.com.
- Set ‘Default’ as ‘Yes’ is you require this email to be the default email for your system. Other mailboxes can be configured here but only one mailbox can be selected as the ‘Default’ for your system.
2.)If you plan to use Service Messaging, then you must enable it here by setting ‘Service Messaging’ to ‘Yes’
3.) Add your M365 tenant details from the Enterprise application configuration. You must include:
- Directory (tenant) ID
- Application (client) ID
- Client Secret Value

Service Messaging
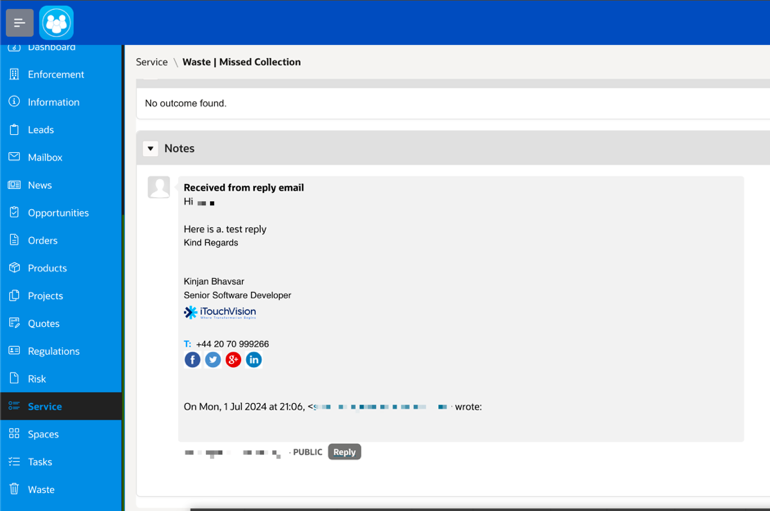
When a User responds to an email notification, the content of the email, along with any attachments will be added as a note to the Service Request (SR). This includes manual emails sent from within the SR, and emails generated from rules.
Further actions which can then take place include:
Once a note is added to the SR, the status of the SR can be updated to a specific status to reflect the notification.
Any attachments added to the email response will be added to the SR under attachment region within ‘Other’ folder.
The system will record within the history of the SR; the note was created as a response to the email.
Note Configuration
Within your MCS Client, go to Administration > General > Type
A Service Request Note Type must be configured. This must have a code of ‘PUBLIC’. We recommend that the Access Level is set to ‘User’ only.
Email Reply Text
Within your MCS Client, go to Administration > Mail > Templates
Within your mail template settings, the reply to text must be set with the text
##- Please type your reply above this line -##
#EC_ID#
This can be added using the ‘Set Example text’ button within but will be set by default.
This text will appear at the top of each email sent. It is important that this text is not disturbed upon reply as this is critical to the system validating the identity of the Service Request relating to the email.
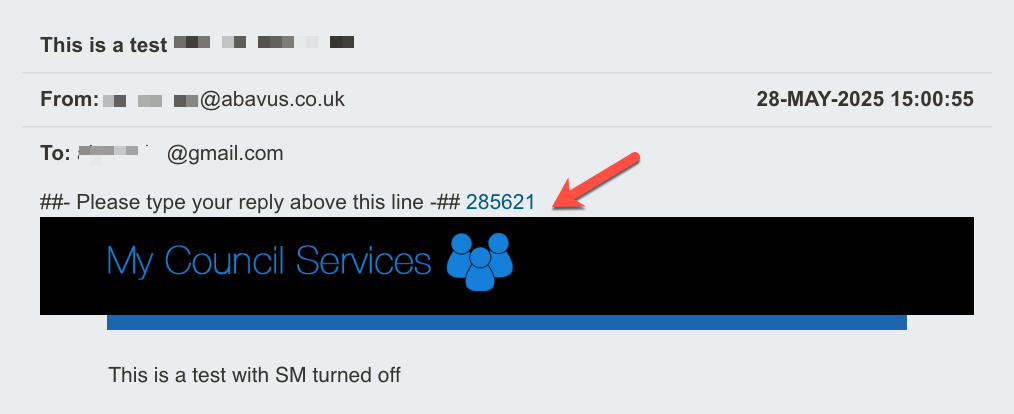
For configuration purposes, the text ‘Please type your reply above this line’ can be changed between the hash tags ##- Please type your reply above this line -## if needed but #EC_ID# must always remain.
Was this article helpful?
That’s Great!
Thank you for your feedback
Sorry! We couldn't be helpful
Thank you for your feedback
Feedback sent
We appreciate your effort and will try to fix the article